


Countdown to the 100th Post Giveaway: 97 posts!
I just discovered that I like making animated buttons for blogs. I've done two today and could keep going if laundry and cleaning wasn't calling my name. Here are the steps I took to make mine:
1. Find a background for the button you want to make. I found mine on PC Layers.
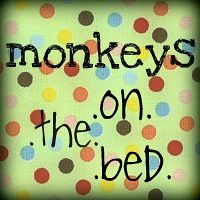
2. Make sure you have this background image saved to your computer. Here is what mine looked like before I started editing it:
4. Once on Picnik, I cropped my image into a square, rotated it, fiddled with the colors, and added a border (you have lots of editing and formatting options on Picnik):
5. After I was happy with the square background, I saved it as "Tutorial Button 1.jpg". Make sure you save each picture onto your computer!!!
6. After saving, Picnik allows you to continue editing the picture you were working on--this is a great feature because you do not have to re-upload anything!
7. I then added some words that I wanted to flash first on my button:

6. After saving, Picnik allows you to continue editing the picture you were working on--this is a great feature because you do not have to re-upload anything!
7. I then added some words that I wanted to flash first on my button:
8. I saved this picture, just like I did in #5 and #6.
9. I continued to edit, add words, save, edit, add (or subtract) words, save, etc. until I was happy with what my button said. Some fun features at Picnik let you flip the words horizontally or vertically. You can also add stars and other fun shapes and cllipart images.
10. Now that I have all of my button images saved (as Tutorial Button 1, 2, 3, 4, etc.) I head on over to Picasion, yet another wonderfully free editing software tool.
11. Self-explanatory, but you upload each picture in the order you want it to appear on your button. (Note, in the above case, I uploaded Image 3 twice so that the words went back to being in the proper order).
12. If you would like to customize the size and speed of your button, you can do that at the bottom of the image loader.
13. Click "Create Animation", wait while it loads, and voila! You have a button! Now you just have to copy and paste the url info and you'll be good to go!
14. If you make a button, I'd love to see what it looks like--please leave a comment about it below!


9 people think...:
I love learning stuff like this! Thanks for the tutorial! I'll have to try this out!
Rebecca
RootsAndWingsCo.blogspot.com
We are a mac family too. :) Oh and I tagged you!! :) Come and pick it up.
Thanks for posting this! I was just wondering how to make one! How cool, thanks!
I tried it out and just have one question, it may be silly but how do you get it on your blog? I've saved it on my computer and tired loading it using "add a gadget" and "picture" and a couple other ways but it won't load. What do think?
Ok, Silly ol' me... i realize that they give you the html code to put in on your blog. I put it up! It's called Our Family right under the About Me section of my blog!
I think i'm going to be like you... i could make them all day!
okay,
I added a button, but when I click on the button it goes to http://picasion.com/get-photo/
How do I get it to go to my blog.
Also, how do you get the copy for people to copy?
Thanks for this tutorial! I have always wanted to make a button, but was never sure how to do it. You're the best
Okay,
I figured out how to get it to go to my page, but still don't know how to get the code up there for people to copy.
Alright, miss. You may have just started a new blogging craze. This is great! Check my blog out to see what I've done...it might be animation overload now.
I love you for this tute! thanks!!
This is FABULOUS!!! Thank you so much for doing this little lesson!! :)
Post a Comment